flowchart TD
    Start([Start: Player or Admin interaction])
    AdminParameters["Admin updates parameters via control panel"]
    SocketConnect["Player connects via Socket.IO"]
    ServerLogic["Server handles connection and updates game state"]
    DBQuery["Server logs positions in MySQL database"]
    GameStateEmit["Server sends updated game state to players"]
    UIUpdate["Client UI updates with new data"]
    ResetGame["Game reset event triggered by Admin or Player"]
    AdminServerUpdate["Admin updates parameters on server"]
    DatabaseSave["Admin parameters saved in JSON file"]

    Start -->|Admin Input| AdminParameters
    Start -->|Player Connection| SocketConnect
    AdminParameters -->|Sends API Request| AdminServerUpdate
    AdminServerUpdate --> DatabaseSave
    SocketConnect --> ServerLogic
    ServerLogic -->|Database Logging| DBQuery
    ServerLogic -->|Real-time updates| GameStateEmit
    DBQuery -->|Feedback to server| ServerLogic
    GameStateEmit --> UIUpdate
    ResetGame -->|Emit Reset Event| ServerLogic
    ServerLogic -->|Sends Reset State| GameStateEmit
Behavioral Experiment Documentation Report
Documenting JavaScript and HTML Code for a Behavioral Experiment on Social Foraging
This document outlines the workings of the JavaScript and HTML code used for a behavioral experiment on social foraging, simulating a scenario where human participants select charging stations for electric vehicles (EVs).
1. Conceptual Framework and Motivation
Problem Space:
Efficient allocation of limited resources (e.g., EV charging stations) presents significant challenges, especially with dynamic behavior and decision-making. This project studies human resource allocation decisions through a real-time, interactive online tool.
Key Innovations and Advantages:
- Real-Time Interaction: WebSockets provide synchronized, multi-user interactions.
- Customizability: A control panel dynamically adjusts parameters like station count, average prices, and player budgets.
- Integration: Player behavior and station selection data are stored in a MySQL database for analysis.
Future Development Roadmap:
- Enhanced visualization of player actions and system states.
- Integration of machine-learning models for behavior prediction.
- Expanded parameter customization for diverse experimental setups.
2. Architecture and Implementation
System Architecture:
The architecture comprises three main components:
- Client-Side Interface (HTML + JavaScript): Manages user interaction and displays the simulation using a dynamic game map.
- Server-Side Logic (Node.js + WebSocket): Manages connections, synchronizes game states, relays updates, and handles admin parameter changes.
- Database Layer (MySQL): Records player positions for post-experiment analysis.
Data Flow:
- Client connects to server via Socket.IO.
- Server sends initial game state (players, stations).
- Client renders the game.
- Player interacts (moves to a station).
- Client sends player’s action to the server.
- Server updates game state and broadcasts changes to all clients.
- Clients update displays.
- Player positions are periodically saved to MySQL.
Key Data Structures:
gameState(Server): Holds game state (players, stations).
script.js
const gameState = {
players: new Map(), // Map of players and their attributes
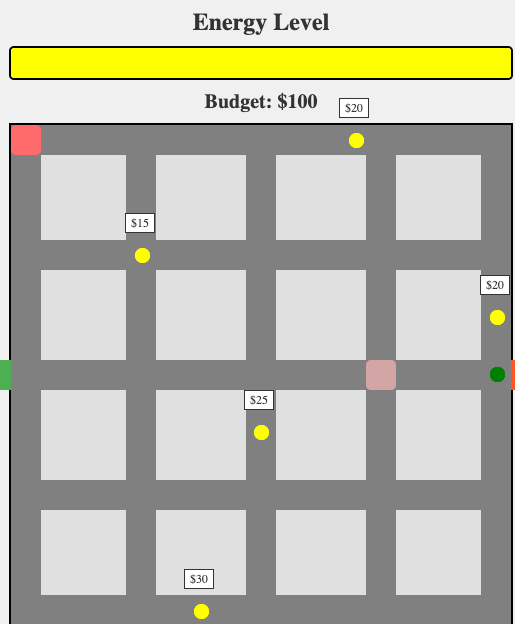
stations: [
{ top: 8, left: 338, cost: 20 },
{ top: 479, left: 183, cost: 30 },
...
],
};- Player Attributes:
- Position (
x,y) - Energy and monetary budgets
- Assigned colors for visual distinction
- Position (
adminParameters(Client & Server): JSON with configurable parameters (station count, mean price, budget, download speed, station size).
3. Key Functions and Their Purpose
script.js
const setInitialParameters = async () => { ... }Purpose: Retrieves initial game parameters from the server or defaults. Sets initial admin panel slider values.
script.js
updateButton.addEventListener('click', () => { ... });Purpose: Sends updated parameters from the admin panel to the server.
server.js
const insertPlayerPosition = async (playerId, positionX, positionY) => { ... }Purpose: Records player position in the MySQL database.
io.on('connection', (socket) => { ... });Purpose: Handles new player connections, initializes player data, sends initial game state, manages movement/disconnections, and the game reset.
app.put('/admin-parameters', async (req, res) => { ... });Purpose: Handles and validates incoming admin parameters. Updates AdminParams, saves to admin-data.json and sends parameter information to the players.
4. Key Features and Functionality
Feature 1: Synchronized Game State
- Real-time Interaction: Socket.IO enables responsive gameplay.
- Why: Ensures consistent user experience in multi-user settings.
- How: Employs WebSocket to propagate real-time updates.
server.js
io.on('connection', (socket) => {
    const player = {
        id: socket.id,
        positionX: 0,
        positionY: 235,
        energy: 100,
        money: 100,
        color: getRandomColor(),
    };
    gameState.players.set(socket.id, player);
    io.emit('gameState', gameState);
});
Feature 2: Dynamic Parameter Control
- Why: Facilitates experiment customization without server restarts.
- How: Parameters are adjustable via a control panel in the interface.
index.html
<label for="stationCount">Number of Stations:</label>
<input type="range" id="stationCount" min="1" max="20" value="5" />
Feature 3: Data Logging
- Why: Enables in-depth analysis of participant behavior.
- How: Logs player positions and actions into a MySQL database.
server.js
const insertPlayerPosition = async (playerId, positionX, positionY) => {
    const query = `INSERT INTO player_positions (player_id, position_x, position_y) VALUES (?, ?, ?)`;
    await mysqlConnection.execute(query, [playerId, positionX, positionY]);
};- Admin Control Panel (
admin.html): Dynamically adjusts parameters. - Data Persistence (MySQL): Stores player data for analysis.
- Game Reset: Allows restarting from initial conditions.
5. Installation and Getting Started
- Install dependencies:
npm install express socket.io mysql2- Start the server:
node server.js- Open
index.html: In a web browser. - Open the Admin Control Panel:
http://localhost:3000/admin
6. Limitations
- Matching Algorithms: Currently limited.
- Scalability: May require optimizations for large numbers of players.
- Game Logic: Requires more detailed implementation of energy, charging, and monetary mechanics.
7. Conclusion
This documentation outlines the structure and operation of the experiment software. Future work will focus on scalability, user experience, and integration with advanced analytics.
Appendix
server.js code.
import express from 'express';
import http from 'http';
import { Server } from 'socket.io';
import path from 'path';
import mysql from 'mysql2/promise';
import { fileURLToPath } from 'url';
import adminData from './admin-data.json' with { type: "json" };
import { writeFile } from 'fs/promises';

const __filename = fileURLToPath(import.meta.url);
const __dirname = path.dirname(__filename);

const app = express();
const server = http.createServer(app);
const io = new Server(server);
app.use(express.json())
let AdminParams  = adminData;
// Configuración del puerto
const PORT = process.env.PORT || 3000;

const gameState = {
    players: new Map(),
    stations: [
        { top: 8, left: 338, cost: 20 },
        { top: 479, left: 183, cost: 30 },
        { top: 123, left: 124, cost: 15 },
        { top: 300, left: 243, cost: 25 },
        { top: 185, left: 479, cost: 10 },
    ],
};

let mysqlConnection;
const configureMySQL = async () => {
    try {
        mysqlConnection = await mysql.createConnection({
            host: 'ec2-3-85-172-100.compute-1.amazonaws.com',
            user: 'scastrom',
            database: 'pathTracker',
            password: 'samuel2024',
        });
        console.log('Conexión exitosa a MySQL');
    } catch (err) {
        console.error('Error al conectar a MySQL:', err.message);
    }
};